Mike Schaeffer's Blog

January 14, 2022

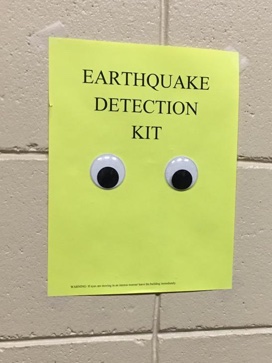
This image has been circulating on LinkedIn as a tongue and cheek example of a miminum viable product.

Of course, at least one of the responses was that it's not an MVP without some extras. It needs 24/7 monitoring or a video camera with a motion alarm. It needs to detect quakes that occur off hours or when you're otherwise away from the detector. The trouble with this statement is the same as with the initial claimed MVP status of this design - both claims make assumptions about requirements. The initial claim assumes you're okay missing quakes when you're not around and the second assumes you really do need to know. To identify an MVP, you need to understand what it means to be viable. You need to understand the goals and requirements of your stakeholders and user community.

Personally, I'm sympathetic to the initial claim that two googly eyes stuck on a shet construction paper might actually be a viable earthquake detector. As a Texan transplant to the Northeast, I'd never experienced an earthquake until the 2011 Virginia earthquake rattled the walls of my suburban Philly office. Not having any real idea what was going on, my co-workers and I walked over to a wall of windows to figure it out. Nothing bad happened, but it wasn't a smart move, and exactly the sort of thing a wall mounted earthquake detector might have helped avoid. The product doesn't do much, but it does do something, and that might well be enough that it's viable.

This viability, though, is contingent on the fact that there was no need to know about earthquakes that occurred off-hours. Add that requirement in, and more capability is needed. The power of the MVP is that it forces you to develop a better understanding of what it is that you're trying to accomplish. Getting to an MVP is less about the product and more about the requirements that drive the creation of that product.

In a field like technology, where practicioners are often attracted to the technology itself, the distinction between what is truly required and what is not can be easy to miss. Personally, I came into this field because I like building things. It's fun and rewarding to turn an idea into a working system. The trouble with the MVP from this point of view is that defining a truly minimum product may easily eliminate the need to build something cool. The answer may well be that nNo, you don't get to build the video detection system, because you don't need it and your time is better spent elsewhere. The notion of the MVP inherently pulls you away from the act the build and forces you to to consider that there may be no immediate value in the thing you aim to build.

One of my first consulting engagments was years ago, for a bank building out a power trading system. They wanted to enter the business to hedge other trades, and the lack of a trading system to enforce controls limits was the reason they couldn't. Contrary to the advice of my team's leadership, they initially decided to scratch build a trading system in Java. There were two parts of this experience that spoke to the idea of understanding requirements and the scope of the minimum viable product.

The first case can be boiled down to the phrase 'training issue'. Coming from a background of packaged software development, my instincts at the time were competely aligned around building software that helps avoid user error. In mass market software, you can't train all of your users, so the software has to fill the gap. There's a higher standard for viability in that the software is required to do more and be more reliable.

This trading platform was different in that it was in-house software with a user base known that numbered in the dozens. With a user base that well and known small, it's feasable to just train everybody to avoid bugs. A crashing, high severity bug that might block a mass market software release might just be addressed by training users to avoid it. This can be much faster, which is important when the software schedule is blocking the business from operating in the first place. The software fix might not actually be required for the product to be viable. This was less perfect software, and more about getting to minimum viability and getting out of the way of a business that needed to run.

The second part of the story is that most of the way through the first phase of the build, the client dropped the custom build entirely. Instead, they'd deploy a commercial trading platform with some light customizations. There was a lot less to build, but it went live much more quickly, particularly in the more complex subsequent phases of the work. It turned out that none of the detailed customizations enabled by the custom build were actually required.

Note that this is not fundementally a negative message. What the MVP lets you do is lower the cost of your build by focusing on what is truly required. In the case of a trading organization, it can get your traders doing their job more quickly. In the case of an earthquake detector, maybe it means you can afford more than just one. Lowering the cost of your product can enable it to be used sooner and in more ways than otherwise.

The concept of an MVP has power because it focuses your attention on the actual requirements you're trying to meet. With that clearer focus, you can achieve lower costs by reducing your scope. This in turn implies you can afford to do more of real value with the limited resources you have available. It's not as much about doing less, as it is about doingo more of value with the resources you have at hand. That's a powerful thing, and something to keep in mind as you decide what you really must build.

Tags:tech
August 12, 2020

Like a lot of engineers, I have a handful of personal projects I keep around for various reasons. Some are useful and some are just for fun, but none of them get the same sort of investment as a funded commercial effort. The consequence of this is that it's all the more important to keep things as simple as possible, to focus the investment where it counts. Part of the way I achieve that is that I've spent some initial time putting together a standard packaging approach. I know, I know - "standard packaging approach" doesn't sound like "fun personal project" - but getting the packaging out of the way makes it easier to focus on the actual fun part - building out functionality. It's for that reason that I've also successfully used variants of this approach on smaller commercial projects too. Hopefully, this will be useful to you too.

Setting the state, the top level view is this:

  • Uberjar packaging of single binaries using Leiningen and a few plugins.
  • Standard scripts and tools for packaging and install.
  • Use of existing Linux mechanisms for service control.
  • A heavy tendancy toward 12 Factor principles.

What this gets you is a good local interactive development story and easy deployment to a server. I've also gotten it to work with Client side code too, using Figwheel

What it doesn't get you is direct support for large numbers of processes or servers. Modern hardware is fast and capable, so you may not have those requirements, but if you do, you'll need something heavier weight, to reduce both management overhead and costs. (In my day job, we've done some amazing things with Kubernetes.)

The example project I'm going to use is the engine for this blog, Rhinowiki. It's useful, but simple enough to be used as a model for a packaging approach. If you're also interested in strategies for managing apps with read/write persistance (SQL) and rich client code, I have a couple other programs packaged this way with those features. Even with these, the essentials of the packaging strategy are exactly the same as what I describe here:

Everything begins with a traditional project.clj, and the project can be started locally with the usual lein run.

Once running, main immediately writes a herald log message at info level:

(defn -main [& args]
  (log/info "Starting Rhinowiki" (get-version))
  (let [config (load-config)]
    (log/debug "config" config)
    (webserver/start (:http-port config)
                     (blog/blog-routes (blog/blog-init config)))
    (log/info "end run.")))

This immediately lets you know the process has started, logs are working, and which version of the code is running. These are usually the first things verified after an install, so it's good to ensure they happen early on. This is particularly useful for software that's not interactive or running on slow hardware. (I've run some of this code on Raspberry Pi hardware that takes ten or so seconds to get to the startup herald.)

The way the version is acquired is interesting too. The call to get-version is really a macro invocation and not a function call.

(defmacro get-version []
  ;; Capture compile-time property definition from Lein
  (System/getProperty "rhinowiki.version"))

Because macros are evaluated at compile time, the macroexpansion of get-version has access to JVM properties defined at build time by Leiningen.

The next step is to pull in configuration settings using Anatoly Polinsky's https://github.com/tolitius/cprop library. cprop can do more than what I use it for here, but here, I use it to load a single EDN config file. cprop lets the name of that file be identified at startup via a system proprety, making it possible to define a file for each server, as well as a local config file specified in: project.clj.

:jvm-opts ["-Dconf=local-config.edn"]

I've also found it useful to minimize the number and power of configuration settings. Every setting that changes is a risk that something will break when you promote code. Every setting that doesn't change is a risk of introducing a bug in the settings code.

I also dump the configugration to a log very early in the startup process.

(log/debug "config" config)

Given the importance of configuration settings, it's occasionally important to be able to inspect the settings in use at run-time. However, this log is written at debug level, so it doesn't normally print. This reduces the risk of accidentally revealing secret keys in the log stream. Depending on the importance of those keys, there is also much more you can do to protect them, if preventing the risk is worth the effort.

After all that's done, main transfers control over to the actual application:

(webserver/start (:http-port config)
                 (blog/blog-routes (blog/blog-init config)))

With a configurable application running, the next step is to get it packaged in a way that lets us predictably install it elsewhere. The strategy here is a two step approach: build the code as an uberjar and include the uberjar in a self-contained .tar.gz as an installation pacakge.

  • The installer package contains everything needed to install the software (the one exception being the JVM itself).
  • The package name includes the version number of the software: rhinowiki-0.3.3.tar.gz.
  • Files in the installation package all have a prefix (rhinowiki-install, in this case) to confine the installation files to a single directory when installing. This is to make it easy to avoid crosstalk between multiple installers and delete installation directories after you're done with an installation.
  • There is an idempotent installation script (install.sh) at the root of the package. Running this script either creates or updates an installation.
  • The software is installed as a Linux service.

The net result of this packaging in an installation/upgrade process that works like this:

tar xzvf rhinowiki-0.3.3.tar.gz
cd rhinowiki-install
sudo service rhinowiki stop
sudo ./install.sh
sudo service rhinowiki start

To get to this point, I use the Leiningen release task and the lein-tar plugin, both originally by Phil Hagelberg. There's a wrapper script, but the essential command is lein clean && lein release $RELEASE_LEVEL. This instructs Leiningen to execute a series of tasks listed in the release-tasks key in project.clj.

I've had to modify Leiningen's default list of release tasks, in two ways: I skip signing of tagged releases in git, and I invoke lein-tar rather than deploy. However, the full task list needs to be [completely restated in project.clj](https://github.com/mschaef/rhinowiki/blob/master/project.clj#L42), so it's a lengthy setting.

:release-tasks [["vcs" "assert-committed"]
                ["change" "version" "leiningen.release/bump-version" "release"]
                ["vcs" "commit"]
                ["vcs" "tag" "--no-sign" ]
                ["tar"]
                ["change" "version" "leiningen.release/bump-version"]
                ["vcs" "commit"]
                ["vcs" "push"]]

The configuration for lein-tar is more straightforward - include the plugin, and specify a few options. The options request that the packaged output be written in the project root, include an uberjar, and extract into an install directory rather than just CWD.

:plugins [[lein-ring "0.9.7"]
          [lein-tar "3.3.0"]]

;; ...

:tar {:uberjar true
      :format :tar-gz
      :output-dir "."
      :leading-path "rhinowiki-install"}

Give the uberjar a specific fixed name:

:uberjar-name "rhinowiki-standalone.jar"

And populate it with a few files additional to the uberjar itself - lein-tar accepts these files in pkg/ at the root of the project directory hierarchy. These files include everything else needed to install the application - a configuration map for cprop, an install script, a service script, and log configuration.

The install script is the last part of the process. It's an idempotent script that, when run on a server as sudo, guarantees that the application is installed. It sets up users and groups, copies files from the package to wherever they belong, and uses update-rc.d to ensure that the service scripts are correctly installed.

This breaks down the packaging and installation process to the following:

  • ./package.sh
  • scp package tarball to server and ssh in
  • Extract the package - tar xzvf rhinowiki-0.3.3.tar.gz
  • Change into the expanded package directory - cd rhinowiki-install
  • Stop any existing instances of the service - sudo service rhinowiki stop
  • Run the install script - sudo ./install.sh
  • (Re)Start the service - sudo service rhinowiki start

At this point, I've sketched out the approach end to end, and I hope it's evident that this can be used in fairly simple scenarios. Before I close, let me also talk about a few sharp edges to be aware of. Like every other engineering approach, this packaging strategy has tradeoffs, and some of these tradeoffs require specific compromises.

The first is that this approach requires dependencies (notably the JVM) to be manually installed on target servers. For smaller environments, this can be acceptable, for larger numbers of target VM's, almost definately not.

The second is that there's nothing about persistance in this approach. It either needs to be managed externally, or the entire persistance story needs to be internal to the deployed uberjar. This is why I wrote sql-file, which provides a built in SQL database with schema migration support. Another approach is just to handle it altogether externally, which is what I do for Rhinowiki. The Rhinowiki store is a git repository, and it's managed out of band with respect to the deployment of Rhinowiki itself.

But these are both specific problems that can be managed for smaller applications. Often times, it's worth the costs associated with these problems, to gain the benefits of reducing the number of software components and moving pieces. If you're in a situation like that, I hope you give this approach a try and find it useful. Please let me know if you do.

September 18, 2019

Amazingly enough, git is now 14 years old. What started out as Linus Torvald's 'three day' replacement for BitKeeper is now dominant enough in its domain that even the Windows Kernel is hosted on git. (If you really are amazed by the age of git, that last bit might be even more amazing.) In any event, I also use git and have done so for close to ten years. Along with a compiler and an editor, I'd consider it one of the three essential development tools. That experience has left me with a set of preconceived notions about how git should be used and some tips and tricks on how to use it better. I've been meaning to get it all into a single place for a while, and this is the attempt.

This isn't really the place to start learning git (that would be a tutorial). This is for people that have used git for a while, understand the basic mechanics, and want to look for ways to elevate their game and streamline their workflow.

The Underlying Data Model

git is built on a distinct data structure, and the implications of this structure permeate the user experience.

Understanding the underlying data model is important, and not that complicated from a computer science perspective.

  • Every revision of a source tree managed by git can be considered a complete snapshot of every source file. This is called a commit.
  • Every commit has a name (or address), which is a hash of the entire contents of the commit. These names are not user friendly (They look like d674bf514fc5e8301740534efa42a28ca4466afd), but they're essentially guaranteed to be unique.
  • If two commits have different contents, they also have different hashes. A hash is enough to completely identify a state of a source tree.
  • Because hashes are a pain to work with, git also has refs. Refs are user friendly symbolic names (master, fix-bug-branch) that can each point to a commit by hash.
  • Commits can't be mutated, because any change to their contents would change their name/hash. Refs are where git allows mutations to occur.
  • If you think of a ref as a variable that contains a hash and points to a commit, you're not far off.
  • Commits can themselves refer to other commits - Each commit can contain references to zero or more predecessors. These backlinks what allow git to construct a history of commits (and therefore a history of a source code tree).
  • The 'first commit' has zero predecessors, a merge commit has two or more.

The result of all this is that the core data structure is a directed acyclic graph, covered nicely in this post by Tommi Virtanen.

Tags:gittech
January 24, 2019

Despite several good online resources, it's not necessarily obvious how friend's wrap-authorize interacts with Compojure routing.

This set of routes handles /4 incorrectly:

(defroutes app-routes
  (GET "/1" [] (site-page 1))
  (GET "/2" [] (site-page 2))
  (friend/wrap-authorize (GET "/3" [] (site-page 3)) #{::user})
  (GET "/4" [] (site-page 4)))

Any attempt to route to /4 for a user that doesn't have the ::user role will fail with the same error you would expect to (and do) get from an unauthorized attempt to route to /3. The reason this happens is that Compojure considers the four routes in the sequence in which they are listed and wrap-authorize works by throw-ing out if there is an authorization error (and aborting the routing entirely).

So, even though the code looks like the authorization check is associated with /3, it's really associated with the point in evaluation after /2 is considered, but before /3 or /4. So for an unauthorized user of /3, Compojure never considers either the the /3 or /4 routes. /4 (and anything that might follow it) is hidden behind the same security as /3.

This is what's meant when the documentation says to do the authorization check after the routing and not before. Let the route decide if the authorization check gets run and then your other routes won't be impacted by authorization checks that don't apply.

What that looks like in code is this (with the friend/authorize check inside the body of the route):

(defroutes app-routes
  (GET "/1" [] (site-page 1))
  (GET "/2" [] (site-page 2))
  (GET "/3" [] (friend/authorize #{::user} (site-page 3)))
  (GET "/4" [] (site-page 4)))

The documentation does mention the use of context to help solve this problem. Where that plays a role is when a set of routes need to be hidden behind the same authorization check. But the essential point is to check and enforce authorization only after you know you need to do it.

Older Articles...